Tuesday, January 19, 2010
2 tiered cupcake stand
I am hosting my sister-in-laws baby shower this weekend and thought a cupcake stand would make a good addition to the decor...and since I'm on a tight budget, I made it myself from things I already had at home.
Tuesday, January 12, 2010
Fancy Frames
I took a plain wood frame and made it ... fancy!
You'll need:
wooden frame (or any other frame with potential)
clear glass stones (dollar store)
hot glue
paint (I mixed silver metallic and black paint)
paint brush
wooden frame (or any other frame with potential)
clear glass stones (dollar store)
hot glue
paint (I mixed silver metallic and black paint)
paint brush
This is how I did it:
paint frame
lay stones on frame
once you are happy with the layout of your stones .. glue them on
and you're done!
for added "fancy-ness" you can add a bow to the top
paint frame
lay stones on frame
once you are happy with the layout of your stones .. glue them on
and you're done!
for added "fancy-ness" you can add a bow to the top
Easy Peasy Lemon Squezzy!! (as my friend Jen would say =) )
Monday, January 11, 2010
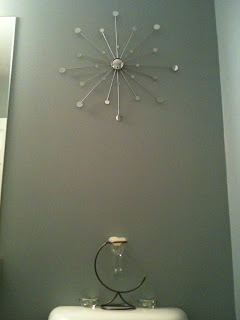
Starburst Mirror
You will need:
~skewers or dowels
~hot glue
~small round craft mirrors - walmart $1.97 ..25 pk
~cardboard
~scissors - strong enough to cut through skewes
~ruler and protractor
~pencil
~small automotive mirror - walmart $1.97
~silver metallic paint
~paint brush
~wall fastener so you can hang your piece
How to:
~using automotive mirror, trace circle onto cardboard
section the circle into equal pie pieces using your ruler and protractor
~now take 16 skewers, 8 of these need to be cut shorter by a couple inches
~using hot glue, apply the 8 longer skewers - first at 90 deg. angles (this will make a cross) - now at 45 deg. angles (in between each 90 deg angle
~now apply the 8 smaller skewers using hot glue. These will be applied between each of the larger skewers
~now you will need to apply the mirrors... First apply the automotive mirror to the center of the piece using the hot glue
~next, apply the 8 larger craft mirrors to each larger skewer
~then apply the 8 medium craft mirrors to each smaller skewer
~finally, measure a few inches down on the larger skewers and apply the 8 small craft mirrors
~lastly, apply a wall fastener to the back to the piece.
Sunday, January 10, 2010
Pacifier Clips


You will need:
- ribbon of your choice
- clip ( I used a name tag clip )
- embellishment glue
- notion of your choice
- ruler
- scissors
- Velcro stickers
- lighter
- double sided tape or fabric tape
- cut ribbon to desired length
- using lighter, melt the two cut edges. This will prevent fraying in the future
- apply Velcro to the "wrong" side of the ribbon - one at the very end and the other about 2 inches from the end. This will give you the "loop" that will allow you to attach the pacifier
- some clips will allow you to attach the ribbon on by looping it into a provided hole, while others (like the ones I used) require you to glue the ribbon on. For this I used embelishment glue. It's great for applying metal to fabrics.
- if you're looping your ribbon through a provided hole, ensure you secure the end using either double sided tape or fabric tape
- if you're gluing the ribbon onto the clip, use embellishment glue - and do this now. allow to set for 10 minutes
- now carefully glue on your notion to the clip using embellishment glue. Be careful to not move your clip around a lot, as the glue takes awhile to set completely. Follow directions on bottle.

Saturday, January 9, 2010
Infant Headbands

These are easy to do, take no time at all, and look super cute!
You will need:
How to:

You will need:
- ribbon of your choice
- notion of your choice ( I chose a buckle style notion)
- embellishment glue
- Velcro stickers
- lighter
- tape measure
How to:
- measure baby's head - add an inch or so for growth
- cut ribbon to that length
- using lighter, slightly melt ends so in time they won't fray
- add Velcro stickers - two of each side will be needed to allow for adjustment as baby grows
- if using a glue on notion, do this now and allow to set

Subscribe to:
Posts (Atom)


